

Undeniable fact: chocolate chip cookies are incredible. #TRUTH The not-too-sweet cookie dough with the gooey deliciousness of melty milk chocolate chips or chunks? Heavenly. (Totally not running to my kitchen to scarf some down right now.)
Now, do you remember when you discovered how much better a chocolate chip cookie is when you add a little bit of sea salt? Oh yes. Just add a pinch of sea salt (we like crystals over flakes, naturally?) and suddenly even the humblest of store-brand chocolate chip cookies are elevated into something sublime.
Believe it or not, your blog is the chocolate chip cookie of your marketing efforts. Gooey and delicious = rich and satisfying. What’s the salt that makes your blog even better?
A little tool named Yoast.
Yoast makes your blog even better by showing you how to make your content better. (Sadly I must abandon the cookie metaphor for now, but it will be back.)
Quite simply, Yoast helps you optimize your content based on a keyword or phrase.
It works a little like this:
- You pick a keyword or phrase that you want to write about (AKA, choose the topic)
- You write your post, title, slug, add imagery, etc. (AKA, you do the work)
- Yoast then tells you how well you did (AKA, your report card)
- BONUS: Yoast will give you specific ideas to improve your grade!
Here’s a very basic run-through of how you can use Yoast for your blogging efforts.
Step #1 – Pick a Focus Keyword (Topic)
This is pretty simple. What is your blog post (going to be) about? That’s your topic…and it’s also your keyword. (Learn more about this here.)
There’s a lot to talk about when it comes to keywords and keyword research. There are many sources of inspiration, sources of data, and techniques that go into planning your keyword editorial. I’m not going to get into all of that here, but I do fully support doing your research.
Let’s say your blog topic will be “Neutral Wedding Bouquets.” This is a great keyword because it’s both broad and specific to a niche audience.
Now that you have your keyword, it’s time to start the writing process.
Step #2 – Write Your Blog Post
Writing – the most challenging part! I’ve broken it down for you into three pieces:
- Outline it
- Write it
- Beef it up
Outline it
Personally, when it comes to writing content, I write an outline first.

I go back to the tried-and-true 5-paragraph essay:
- Intro with Main Point or Thesis statement
- Point 01
- Point 02
- Point 03
- Conclusion.
I begin by figuring out my “thesis.” Since I already know my topic, I write my thesis to include that keyword or phrase. I also come up with the first sentence of each of the “Point” paragraphs to include that keyword.
Tip: There’s no need to stick to 3 points. It can be 2 points; it can be 5. How many should it be? There should be as many points as prove your thesis, my friend!
Lastly, I write the intro and conclusions. Remember, your draft doesn’t need to be perfect. You’re going to let Yoast help you.
Write it
Here are a few more quick tips to help your blog writing: (they will help your grade!)
- Speak Simply – I think it can be really tempting to want to “sound smart” when you write. That will convey authority, right? Actually, no. At best, you’ll bore your reader. At worst, you’ll confuse them and send them screaming from your website! My number one advice is to follow Susan Hyatt’s advice in her blog post, “Shoe Sale Energy.”
- Keep it Short and Sweet – While you want a thorough post as a whole, we want to keep our paragraphs short and sweet. This is where I want you to break the rules you learned in school! Your paragraphs can include JUST ONE sentence – it’s okay. Paragraphs that are 1-3 sentences are skimmable and easy for the reader to digest on screen.
- Remember Incognito Sales – Do you naturally mention a service that you happen to offer in your post? Throw a link in that goes to your Services page. Can you recommend another post to the reader? Work it in and add the link. Be helpful and casual – not too salesy.
When I build the post in WordPress’ Block Builder, I structure my paragraphs using those section titles as headings!
- INTRO + THESIS – paragraph blocks
- POINT 01 TITLE – heading 2 block
- POINT 01 CONTENT – paragraph blocks
- POINT 02 TITLE – heading 2 block
- POINT 02 CONTENT – paragraph blocks
- POINT 03 TITLE – heading 2 block
- POINT 03 CONTENT – paragraph blocks
- CONCLUSION – paragraph blocks
Beef it up
Don’t stop there! Add a few fun elements to reinforce your points. Add a few subheadings. Would an image help illustrate the content? Let’s add it in where applicable. What about any other type of special content blocks? Now’s the time to add those too! At this point, my content’s architecture might look like this:
- INTRO + THESIS – paragraph blocks
- POINT 01 TITLE – heading 2 block
- POINT 01 CONTENT INTRO – paragraph blocks
- POINT 1A TITLE – heading 3 block
- POINT 1A CONTENT – paragraph blocks
- POINT 1B TITLE – heading 3 block
- POINT 1B CONTENT – paragraph blocks
- POINT 1C TITLE – heading 3 block
- POINT 1C CONTENT – paragraph blocks
- POINT 01 CONTENT CONCLUSION – paragraph blocks
- POINT 02 TITLE – heading 2 block
- POINT 02 CONTENT – paragraph blocks
- POINT 02 IMAGE – single image block
- POINT 03 TITLE – heading 2 block
- POINT 03 CONTENT – paragraph blocks
- POINT 03 QUOTE – quote block
- CONCLUSION – paragraph blocks
NICE! This looks like an expert piece of content. Let’s see how you did. Did you get that green light?
Step #3 – Get Your “Grade” from Yoast
All right, your post is built in the Block Builder…time for the moment of truth! Save that bad boy one last time so ALLL of your content goes through the Yoast analyzer.
Scroll on down to the Yoast tab. (And don’t be scared.) Let’s set you up for success by doing three simple starter steps:
- Add your keyword or phase that you want to be graded on.
- Add your SEO Title in the Snippet Editor.
(“Snippets” are the text that show up in search engine results.) While this can be the same as your Blog Title, I suggest removing the default data bubbles in this area to type in a SEO Title that’s geared toward people who are finding you through a search engine. (Peep more on this topic on the Yoast website.)
- Add your Meta Description in the Snippet Editor
This is where you write a captivating lead-in and summary of the page that will entice search engine skimmers to visit your post! Yoast has yet another great post on the subject here → https://yoast.com/meta-descriptions/

SOURCE: Yoast.com
Once all of this is in place, it’s time to look at the colors! Oh the colors! (I’m a designer. Of course I get excited about colors!)
So the coloring system is based on 5 colors that I’ve interpreted for you:
- GREY – no grade
- RED – bad news bears
- ORANGE – needs improvement
- YELLOW – getting closer {this one is not really seen anymore, they might have discontinued its use}
- GREEN – amazing!
So the goal is Green!! Actually, the goal is for TWO Green lights: one for SEO, and one for READABILITY.
The SEO tab is based on your Focus Keyphrase that you entered in.

The Readability tab will grade how easy it is to read your post by looking at sentence structure, verb tenses, active vs. passive voice, etc.
Step #4 – Improve and Optimize
But, what if you don’t have two green grades. ?No fear!
This is easily the best part about Yoast. If you get a green grade–THEY TELL YOU HOW TO IMPROVE YOUR POST! Simply amazing.
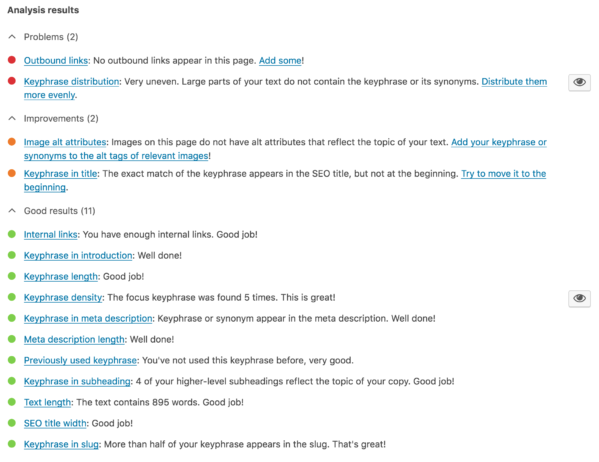
Each tab (SEO and READABILITY) will show you where your post is thriving and where it needs some love.
Once you expand your Analysis results, you will see a whole bunch of bulleted action steps. They are grouped into “Problems” and “Improvements” you can make. Genius.
Each individual one explains itself as to how it relates to your post. And if something is confusing, all you need to do is click on the blue title of the bulleted item. That will take you to a full explanation!
Important note
You will never have a 100% success rate for all green bullets with every single post. And that’s okay. All of this grading is cumulative and averages out to simply help you and encourage you.
Even if you have a few red and orange bullet points–you can still get a green score for the post as a whole! #Winning
Similarly, not every post will go green as a whole, but if you can keep your website as a whole averaging way more greens than not – Also #Winning!
In short, don’t chase the dragon of all green bullets. More on the temptation of the green bullets → https://yoast.com/want-green-bullet-wp-seo/
See how Yoast is the best friend your website has always wanted?
Yoast is your website’s best friend. It’s a chocolate chip cookie that’s all nutrition and zero carbs/sugar/fat.
I’m not a professional writer, but Yoast makes me look like one. It’s always there to encourage me, give me a virtual pat on the back, and tell me the harsh truth when needed.
The good news is that when you start to blog more and more often, you will get to know Yoast as a true bestie! You will predict its advice and know-how to make it happy from the jump.
So that’s my introduction, I hope you and Yoast can have a fruitful relationship as your content marketing takes off!